


Welcome to the second article about how to create your Threat Modeling Templates.
The first one, where I introduced how to create your own Template, can be found in Threat Modeling Templates: how to start your own.
This new article discusses the first Tab in the Template Editor, which is dedicated to creating and modifying the various entities that are used within the model.

The Tab shows a two levels tree, with the first level defining the basic entities, and the second level the specialized ones. In other words, you will find in the first level items like the Generic Process, the Generic External Interactor and so on. Please consider that this series of articles is not about the basic concepts of Threat Modeling: you should already know what a Process is.
Under the Generic entities, you will find the specialized entities, like the OS Process, the Thread, the Web Application and so on.
You can create your base entity, if you want: you are not limited to the pre-defined ones.
If you select an entity in the tree, you will find in the right pane its definition, and you will be able to change it.
The properties of the entities, are:
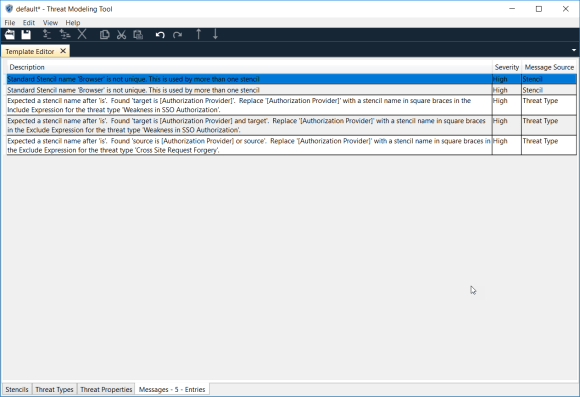
- Name: it identifies the entity itself. It does not uniquely identify the entity, though: you may be able to create two entities with the same Name; it will create some errors in the Messages Tab, which is the 4th Tab, as shown in the image below.
- Description: the description of the entity.
- Behavior: it allows to specify the type of entity: is it a Flow? A Boundary? Or a common entity, that is also known as a Target.
- Shape: it allows to specify the variant of the type defined with the Behavior. For example, the Target can assume the shape of an Ellipse (for the Processes), a Rectangle (for the External Interactors), or of two parallel lines (for the Data Storages). The Flow can only be a line, and the Boundaries can be Line or Rectangle.
- Width: it allows to specify the width of the lines.
- Dash: defines the type of the lines to show. If absent, the default dash is applied.
- Choose Image: allows chosing an image for the entity. A good source of free images is the Microsoft Azure, Cloud and Enterprise Symbol / Icon Set.
- Image Location: defines the position of the image within the stencil.
You can also define properties associated to an entity. Each property has multiple pre-defined values: the first one is considered the default value. You can add properties through the Add Property button. Properties are used to decide if a Threat should be generated automatically or not, therefore they play an important role.
Specialized entities are exactly the same as the base entities, but they allow constraining the value of properties to specific values. You can also add new Properties, but you cannot modify the properties defined in the base entity.
For now, it is enough.
Happy editing of your Template!


Hello, No doubt this blog provides a good start with the custom templating using Microsoft Threat Modeling. However, I think this article should have described a little more in-depth about what are the entity properties and constraints, and how they play important role in generating the threats with some examples.
LikeLiked by 1 person
Thank you Praveen for your constructive feedback. It’s much appreciated.
LikeLike